
Embedded SDK
This page reflects the current API behaviour. Some details may change as v3 is finalised.
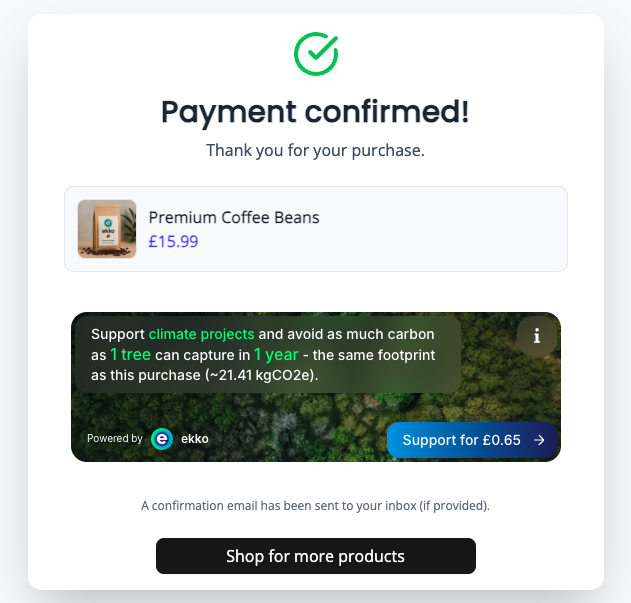
The embedded SDK runs inside your existing order confirmation page. It adds a modular component that shows consumers the impact of their purchase and gives them the option to contribute via ekko's hosted payment flow. Because it is embedded in an existing page, the experience feels native.
Step-by-step flow
-
Create an organisation. Use
POST /v3/organisationsto create an organisation. See Create an organisation for details. -
Create a post-purchase session. Call
POST /v3/post-purchase/sessionsfrom your backend withsdkVariantset toembedded, along with organisation, consumer, transaction and merchant details. You'll receive asessionIdand a short-livedclientSecret. See Create a post-purchase SDK session for the full request and response. -
Initialise the SDK. On the client, use the
clientSecretto authenticate the session. ekko server-side renders the embedded component inside your page container. -
Consumer reviews and contributes. The embedded component is shown on the confirmation page. Consumers see their footprint and can contribute using ekko's hosted payment.
-
Set up webhooks. Subscribe to webhook events to stay in sync:
IMPACT_PAYMENT→ fired when a contribution is processedIMPACT_PAYMENT_REVERSAL→ fired if a payment is refunded or voided
-
Records and reconciliation. Contributions and reversals appear in your reconciliation records.
SDK architecture overview
The ekko Web SDK exposes two main classes:
- Ekko → entry point of the SDK. Initialise with the environment (
sandboxorprod) and optional settings likelocale - EkkoElements → used to create and mount ekko components. For the embedded SDK, this provides the
createImpactPayEmbeddedmethod
Example initialisation
import { Ekko } from '@ekko-earth/ekko-js'

const ekkoInstance = new Ekko('sandbox', { locale: 'en-GB' })

const elements = ekkoInstance.elements({ clientSecret: 'your-client-secret' })

const impactPayElement = elements.createImpactPayEmbedded({
  container: document.getElementById('impactpay-embedded'),
  impactPaySessionId: 'ips_12345'
})
Key inputs
impactPaySessionId(string, required) → returned from the ImpactPay Sessions APIcontainer(HTMLElement, required) → the DOM element where the embedded component is injected and rendered
#impactpay-embedded {
  width: 100%;
  max-width: 600px; /* example */
  margin: 0 auto;
}
Behaviour and requirements
- Sizing → designed to slot into your confirmation page without altering the layout
- Default behaviour → renders inside the specified container at 100% width. Height adjusts to fit content
- Container requirements → provide a container with a fixed width relative to your page layout
ekko SDK height configuration
To make sure the embedded component always looks its best, set a fixed height on the container. The SDK uses height: 100% internally, so you'll want to define height explicitly (not min-height). Here's our recommended height map:
| Screen Width | Device Type | Height |
|---|---|---|
| 0–375px | Very small phones | 200px |
| 376–519px | Regular phones | 190px |
| 520–639px | Large phones | 170px |
| 640–767px | Small tablets | 160px |
| 768–1023px | Tablets | 150px |
| 1024–1279px | Laptops/Desktop | 140px |
| 1280px+ | Large Desktop | 130px |
Example CSS:
/* Base style for the embedded container */
#impactpay-embedded {
  margin: 0 auto;
  width: 100%;
  height: 200px;
  overflow: visible;
}

/* Responsive heights */
@media (min-width: 376px) {
  #impactpay-embedded { height: 190px; }
}
@media (min-width: 520px) {
  #impactpay-embedded { height: 170px; }
}
@media (min-width: 640px) {
  #impactpay-embedded { height: 160px; }
}
@media (min-width: 768px) {
  #impactpay-embedded { height: 150px; }
}
@media (min-width: 1024px) {
  #impactpay-embedded { height: 140px; }
}
@media (min-width: 1280px) {
  #impactpay-embedded { height: 130px; }
}
Integration examples
HTML
<!DOCTYPE html>
<html lang="en">
<head>
  <meta charset="UTF-8" />
  <title>Ekko Embedded ImpactPay</title>
</head>
<body>
  <div id="impactpay-embedded"></div>
  <script type="module">
    import { Ekko } from './node_modules/@ekko-earth/ekko-js/dist/ekko-js.esm.js'

    const ekkoInstance = new Ekko('sandbox')

    const elements = ekkoInstance.elements({ clientSecret: 'clientSecret' })

    const impactPayElement = elements.createImpactPayEmbedded({
      container: document.getElementById('impactpay-embedded'),
      impactPaySessionId: '{impactPaySessionId}'
    })
  </script>
</body>
</html>
React
import React, { useEffect, useRef } from 'react'
import { Ekko } from '@ekko-earth/ekko-js'

const ekkoInstance = new Ekko('sandbox')
const elements = ekkoInstance.elements({ clientSecret: '{clientSecret}' })

const ImpactPayEmbedded = () => {
  const containerRef = useRef(null)

  useEffect(() => {
    if (containerRef.current) {
      elements.createImpactPayEmbedded({
        container: containerRef.current,
        impactPaySessionId: '{impactPaySessionId}'
      })
    }
  }, [])

  return <div ref={containerRef}></div>
}

export default ImpactPayEmbedded
Events
The SDK emits events so your application can react in real time. Subscribe to these events to update your systems or capture analytics.
- ekko:ready → fired when the ImpactPay component has rendered and is ready for interaction
- ekko:balance-impact-clicked → fired when the user clicks the "Support climate action" button inside the element.
- ekko:error → fired when the SDK encounters a critical error. Includes a structured payload with
codeandmessage
Detail/payload structure:
{
  "carbonImpact": {
    "grams": 5655,
    "ounces": 199,
    "compensation": {
      "compensationValue": 0.047,
      "serviceFee": 0,
      "currencyCode": "GBP"
    }
  }
}
{
"impactPaySessionId": "6ec4cc9e-9318-429d-9be4-612dfe47d84e",
"impactPayUrl": "https://staging.impactpay.ekko.earth//en-GB/carbon?referenceId=6ec4cc9e-9318..."
}
{
  "code": "client_secret_expired",
  "message": "Client secret has expired"
}
Example event subscription
// Store the returned element
const impactPayElement = elements.createImpactPayEmbedded({
    container: document.getElementById('impactpay-page'),
    impactPaySessionId: '${impactPaySessionId}',
});

// Listen directly on the custom element (not the container)
impactPayElement.addEventListener('ekko:ready', (event) => {
  console.log('ekko element is interactive', event.detail);
});

impactPayElement.addEventListener('ekko:balance-impact-clicked', (event) => {
  console.log('Support climate action clicked:', event.detail);
});

impactPayElement.addEventListener('ekko:skipped', (event) => {
  console.log('Skipped to order confirmation:', event.detail);
});

impactPayElement.addEventListener('ekko:error', (event) => {
  console.error('ekko element error:', event.detail);
});Note: In TypeScript, the DOM addEventListener callback is typed to receive a generic Event, which doesn't have a detail property. To access the Custom Event's detail, you'll need to cast it to CustomEvent
Error handling
The SDK has built-in safeguards to ensure your confirmation flows are never blocked. Error events follow a standardised structure, so you can capture them in your own telemetry or monitoring systems.
Subscribe to the error event to capture and handle errors.
Error codes
| Code | Message |
|---|---|
| sdk_error | An unexpected error occurred in the SDK |
| iframe_load_error | Failed to load the iframe |
| missing_client_secret | Client secret is missing |
| client_secret_expired | Client secret has expired |
| invalid_params | Missing or invalid parameters provided |
| internal_server_error | Internal server error |
Best practices
- Use the embedded SDK when you control the confirmation page and want a lightweight, native-feeling integration
- Always create sessions server-side and only pass the
clientSecretto the frontend - Ensure the container is sized appropriately in your layout so the component is clearly visible
- Store the
sessionIdfrom the API response and your ownorderReferencefor reconciliation